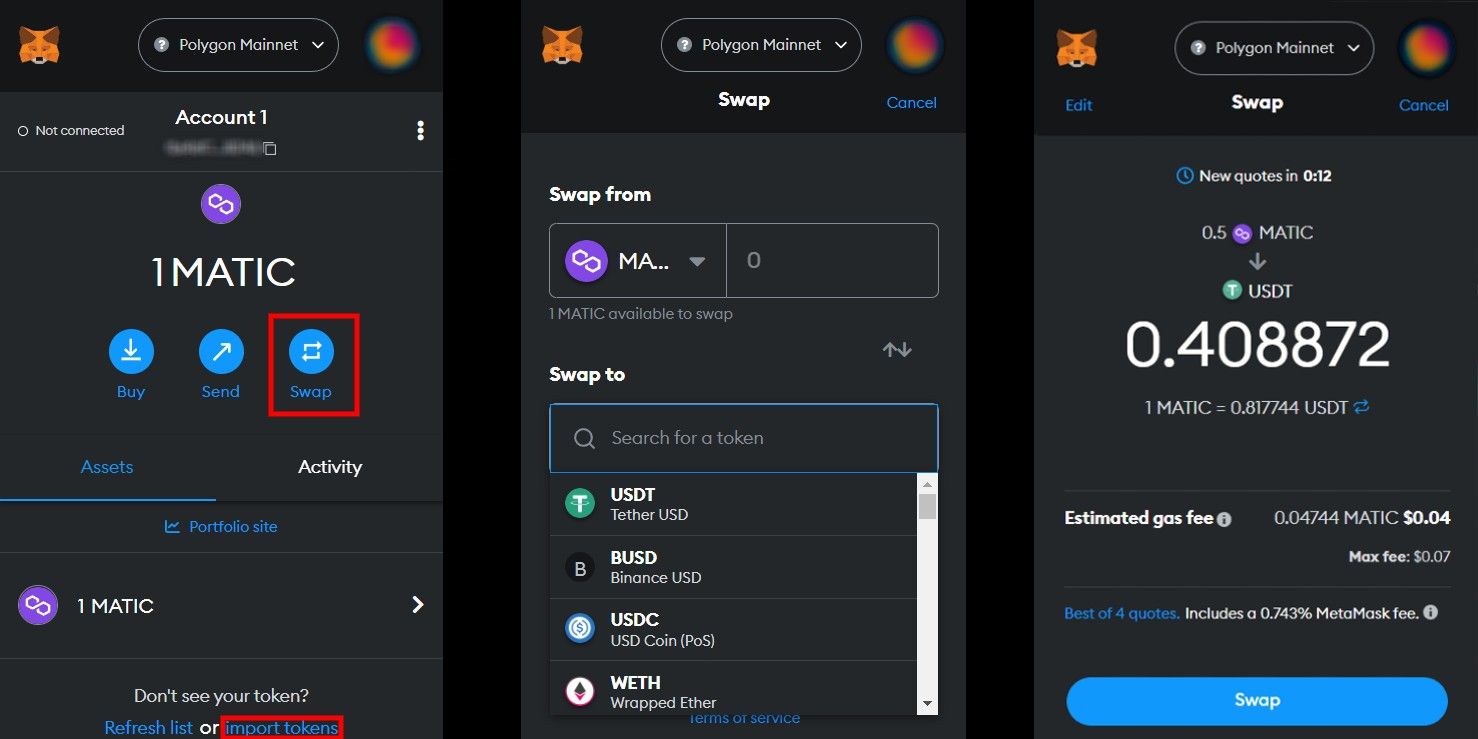
Ethereum’s most popular browser-based crypto wallet, Metamask, has built-in features for adding and exchanging tokens that are very easy to use and understand. Learning to use Ethereum applications can be a headache-inducing experience for Web2 users, let alone understanding how chain trading works. Fortunately, Metamask simplifies everything and does all the heavy lifting behind the scenes.
Creating a Metamask crypto wallet is quite simple. Although using a crypto wallet is not difficult to figure out, there is a learning curve involved, the worst penalty being the permanent loss of assets sent to the wrong address. Blockchain and Web3 are still new technologies, and like all new technologies, they are not user-friendly. Until the creation of Uniswap, the first decentralized exchange (DEX) to gain popularity, exchanging cryptocurrencies on Ethereum was an expensive pain, often based on primitive DEXs that were not suitable for Ethereum’s unusual conditions, forcing users to stick to centralized exchanges like Coinbase.
Today, Metamask provides this option on the main interface under the Swap feature and even has helpful instructions for use on the website. However, it charges a convenience fee of 0.743 percent. Behind the scenes, Metamask compares prices between all DEXs on the same blockchain to find the best possible deal for the user while providing the most simple interface possible. Adding a new token to the interface costs nothing, but exchanging tokens does, and users must keep enough ETH for the blockchain’s gas fee (if using Ethereum) to pay for the transaction.
It is very easy to exchange and add tokens
Token exchange is the same for all Ethereum compatible blockchains (like Polygon), the only difference is the cryptocurrency needed to pay the gas fee. Under the “Swap” tab, select the two tokens to be swapped, with the outgoing token in the top line and the incoming token in the bottom line. If the token does not appear when the ticker symbol is entered, the address must be copied in instead. Then enter the amount to be exchanged or the amount to be exchanged and click “Swap”. The confirmation page will show the tokens being exchanged, the amount that will be received and the gas fee charged for the exchange. If everything looks correct, click Replace. After several seconds, Metamask will pop up with a “Transaction Success” notification and the switch is complete.
To add a token, users simply need to visit a cryptocurrency listing site such as Coingecko or CoinMarketCap and search for the token’s ticker symbol (ie ETH for Ethereum’s ether) in the search field. If a token is not listed on either site, it should be avoided as it may be a scam. Once you find it, look for the token’s address (indicated by a ‘0x’ followed by a series of numbers and letters) and click on the Metamask logo. Metamask will then pop up with a confirmation to add the token, after which the token will appear under the ‘Assets’ list.
Adding and exchanging tokens is not difficult, but it differs from buying/selling on Coinbase. Metamask keeps its own list of cryptocurrencies in its database, so most tokens do not need to be added, but smaller projects will. Understanding how to exchange tokens on-chain is useful for people who want to trade cryptocurrency off an exchange or acquire potentially lucrative (and risky) tokens, but users need to be careful not to get ruined by crypto scams along the way.
Source: Metamask, Coingecko, CoinMarketCap


